Trust is hard to build. There are few brands out there whose word is trusted as law, simply because they said it. For these companies, customers are likely to trust until proven untrustworthy. For the rest of us, trust has to be built from the ground up. If you're going to make a claim, you'd better have the means to back it up.
Luckily, a portfolio of work provides an authentic and reliable record of what makes you qualified and deserving of customers trust in your product or service. Today, we're going to teach you how to create an online portfolio on your website on the HubSpot COS.
With the help of custom modules, we've easily created a portfolio for one our customers, Storyboard Films, on the HubSpot COS. The portfolio offers filter functionality so site visitors can segment videos by a specific type, a title when the image is hovered over, and the ability to click into each portfolio piece interior page to learn more about that piece of work).

Storyboard Films Portfolio Page by SparkReaction
Let's walk through each step of the process to create a portfolio below.
Step 1 - Create a custom module
In order to make it easier for the end user to add new portfolio items on the main page, we are going to setup a custom module that will then be used in a flexible column.
For this specific customer, we needed 4 modules:
-
Interior Page URL: The end user will put in the URL of the interior portfolio page.
-
Preview image: The image we want to show up on the main portfolio page listing.
-
Title: The title of the item that we want to show when a user hovers over the portfolio item.
-
Filter tag: The filter(s) that the end user wants this item to display in when chosen from the filter navigation. The end user can put in more than one filter option by including a space — for example, company product (*note: do not use a comma).
 Screenshot of custom module
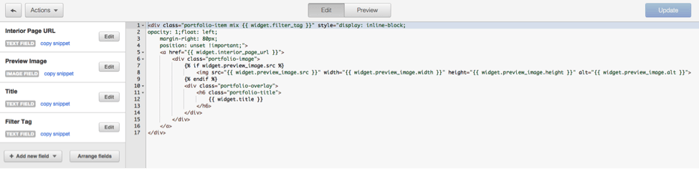
Below, you'll find the HTML code of custom module we created.
<div class="portfolio-item mix " style="display: inline-block; opacity: 1;float: left; margin-right: 80px; position: unset !important;">
   <a href="">
       <div class="portfolio-image">

           <div class="portfolio-overlay">
               <h6 class="portfolio-title">

               </h6>
           </div>
       </div>
   </a>
</div>
You’ll see that we are using a div class of “portfolio-item mix ”. The .portfolio-item class is to provide styling, the .mix class is used in the Isotope js file to know how to filter, and the . is used to set which filters the item should belong to.
Step 2 - Setup the main portfolio page filter nav
The first thing you’ll need to do is create a custom HTML module. This is where your filter nav will be located. Below is the HTML that we used for our filter nav. The data-filter parameter is what aligns with the filter tag we created in the custom module.

<ul class="nav nav-pills portfolio-filters">
   <li class="text-bold text-color-grayDark1">Filter by:</li>
   <li class="filter" data-filter="all"><a href="#">all</a></li>
   <li class="filter" data-filter=".company"><a href="#">company</a></li>
   <li class="filter" data-filter=".product"><a href="#">product</a></li>
   <li class="filter" data-filter=".recruiting"><a href="#">recruiting</a></li>
   <li class="filter" data-filter=".nonprofit"><a href="#">nonprofit/fundraising</a></li>
   <li class="filter" data-filter=".original"><a href="#">original/fun</a></li>
</ul>
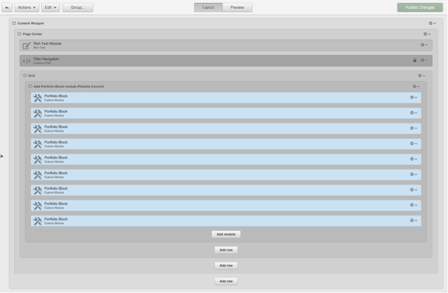
Step 3 - Setup the main portfolio page containers
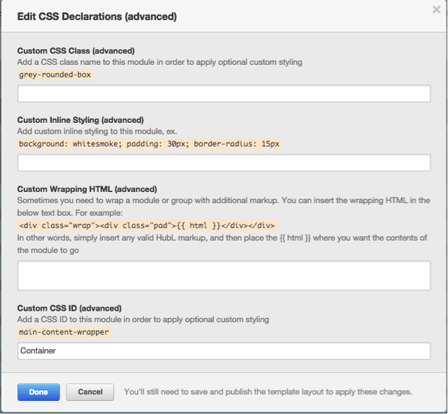
Next, you’ll want to create a Flexible Column that is contained within another group (which we’ve called "Grid"). This outer lying group needs to have a custom CSS ID called “Container” so that the Masonry.js knows which area to apply the masonry and filter to. Once you’ve created the Flex Column, you can add in the custom module you created in Step 1. *Note: You do not need to create individual columns as we’ll be applying JS to do this automatically.
Step 4 - Grab the MixItUp and Masonry Javascript files
For the portfolio, you'll need to download the latest MixItUp and Masonry files and unzip the files.


From here, you can either upload the files into your HubSpot file manager or you can create a new coded template in the Design Manager and copy/paste the code in.
Alternatively, you can forego downloading the files and instead load the files via CDN from:
MixItUp File -- : //cdn.jsdelivr.net/jquery.mixitup/2.1.8/jquery.mixitup.min.js
Masonry File -- //cdn.jsdelivr.net/masonry/3.3.0/masonry.pkgd.min.js
But you're not quite finished yet....
Step 5 - Reference your Javascript plugins
Now that you have the files, you need to update your template in addition to making sure that you are loading the MixItUp and Masonry JavaScript.
The easiest way to do this is to head into your template and embed the script in the Additional HTML Head Markup by choosing Edit -> Edit Head. Then, just copy and paste the script below and replace the URLs with the public URL of your uploaded JavaScript file (get that link by opening the file in Template Builder, clicking "Actions," and choosing "Get Public URL").
<script src="{{ get_public_template_url("custom/page/Storyboard/jquery.mixitup.js") }}"></script>
<script src="{{ get_public_template_url("custom/page/Storyboard/masonry.js") }}"></script>
<style>
.portfolio-item {
   float: left;
   margin-right: 80px;
   position: unset !important;
}
</style>
You’ll also need to add the following code into either your javascript file or, as I prefer, put it in the footer in a custom HTML module that is hidden. This will ensure that the masonry and filters get initiated properly.
$(function(){
$('#Container').mixItUp(
       {
   animation: {
                        duration: 400,
                        effects: 'fade translateZ(-360px) stagger(26ms)',
                        easing: 'ease'
            }
}
);

$('#Container').mixItUp({
callbacks: {
onMixLoad: function(state){
   $('#Container').masonry({itemSelector: '.portfolio-item' });
}
}
});

$('#Container').masonry({
columnWidth: 360,
itemSelector: '.portfolio-item'
});


});
Step 6 - Add CSS to your stylesheet
.portfolio .nav {
   margin-bottom: 0;
   padding-left: 0;
   list-style: none;
}

.portfolio .nav-pills li {
   float: none;
   display: inline-block;
}

.portfolio .nav-pills > li+li {
   margin-left: 30px;
}

.portfolio .text-color-grayDark1 {
   color: #2b2b2b;
}

.portfolio .text-bold {
   font-weight: 700;
}

#Container .mix{
   display: none;
}

#grid .mix {
   display: none;
   opacity: 0;
}

.portfolio-item {
   margin-top: 40px;
}

.portfolio-image {
   position: relative;
}

.portfolio-image img {
   width: 280px;
}

.portfolio-overlay {
   position: absolute;
   top: 0;
   bottom: 0;
   left: 0;
   right: 0;
   opacity: 0;
   {{ transition("all 0.3s ease-out") }}
}

.portfolio-image:hover .portfolio-overlay {
   opacity: 1;
}

.portfolio-overlay {
   background: rgba(4,90,170,.8);
}

.portfolio-overlay .portfolio-title {
   font-size: 16px;
   color: #f0f0f0;
   position: absolute;
   margin: 0;
   left: 25px;
   bottom: 20px;
   {{ transition("all 0.3s ease-out") }}
}
That’s it!
You should now have a functioning and filterable portfolio page. The interior portfolio page design is completely up to you. All the end user has to do is create the interior page and copy the URL for it into the custom module on the listing page.
Leave a comment with examples of your implementation, ideas for improvements, or alternative solutions. I’d love to see what others are doing! While you're at it, check out more tutorials for developing on HubSpot's COS.