This project demonstrates how custom objects can be used inside the HubSpot CMS.
To try this custom objects example you'll need access to some beta functionality. Specifically you'll need to participate in our CRM objects in CMS and CMR Object Field betas.
The sign up form requires a password, as this was announced as part of Developer Day our resources page contains the password at the bottom of the page. Sign up for these betas and more
Before getting started, you'll need an account that has CMS Hub Enterprise and access to the API Key.
- Clone this repo to your machine
- Install dependencies via
npm install - If you already have a
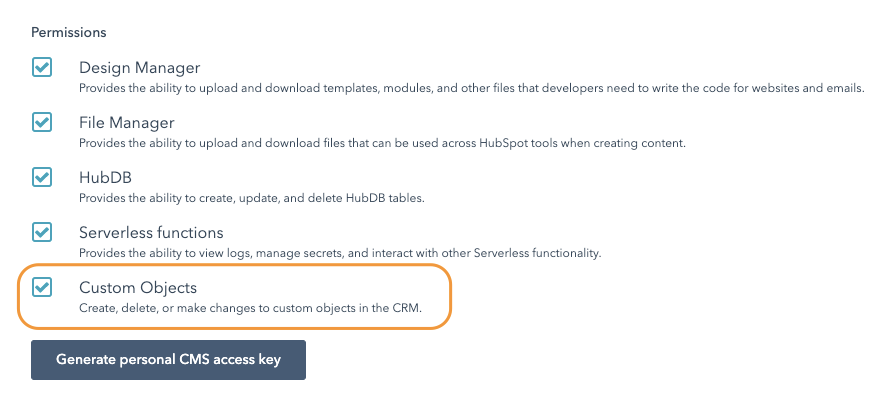
hubspot.config.ymlfile set up, you will need to runhs authand generate a newpersonalaccesskeythat includes the "Custom Objects" permission. Otherwise, runhs initto set up your config file. Make sure to include the "Custom Objects" permission. More info on setting up the config file can be found here.
- Run
npm run setupto create the custom schema and custom object - Copy the API key for your portal from HubSpot API key. You will need to create one if you haven't already. More info on API Keys can be found here.
- Add your API key by running
hs secrets add APIKEY <apikey>using your API key from step 5. This will allow the serverless function used when submitting the form to make authenticated calls. - Create a form that contains the following fields:
- First Name
- Last Name
- Email Address
- Upload the
hub-homesfolder from the repo to your portal by runningnpm run upload - Create a website page that will display property details by using the "Details page" (
details.html) template. The slug for for Details page must be/property; you can change the content slug under the page's settings. Additionally, in the "Property Details Module", you'll need to choose the form that you created in step 7. - Create a website page that will display all property listings by using the "Home page" (
property-listings.html) template - View the newly created page from step 10.