The HubSpot content optimization system is a powerful tool to build dynamic websites and engaging landing pages. In this blog post I would like to unpack how to dynamically change page content using a mix of: custom HTML modules, css classes, and jquery. I’ll first discuss the customer use case, then I’ll finish with how to implement this technique for your customers. So let’s get started!
Customer Use Case
Before I jump into the tactical components of how to code the pages, I would first like to discuss the customer use case. One of my customers Blackwood Builders Group, is a custom home builder in the Seattle, Washington area. They build on average 20 to 30 spec homes per year and they want to use their website as the primary tool to showcase the homes they’ve built.
Some of the key pieces of information that need to be illuminated for every house are:
-
A map of the town or city where the home is located
-
A overview paragraph describing the home
-
A set of images that show what the property and home look like
When I initially tackled this problem I thought one way of solving this was to have sections of the portfolio page cascading down the page. Where each section would have a: map, overview paragraph and set of images. However, laying out the page this way created a poor user experience because of the scrolling required to see all of the properties.
Instead of laying out the page this way I decide to use Jquery to to change the page content dynamically when the user clicked on different “property hyperlinks” under the overview paragraph (view the page here). This solution accomplished both goals of having all of the portfolio properties on one page, while not requiring the user to scroll significantly to see all of the sections.
How to Implement The Effect
The HubSpot Modules
To implement this effect you must first prepare the HubSpot Modules. In the portfolio page for Blackwood Builders Group there are the following things:
-
Six 6 different property sections, and each property section has:
-
An image slider
-
A headline
-
A map
-
A overview paragraph
-
And a call-to-action
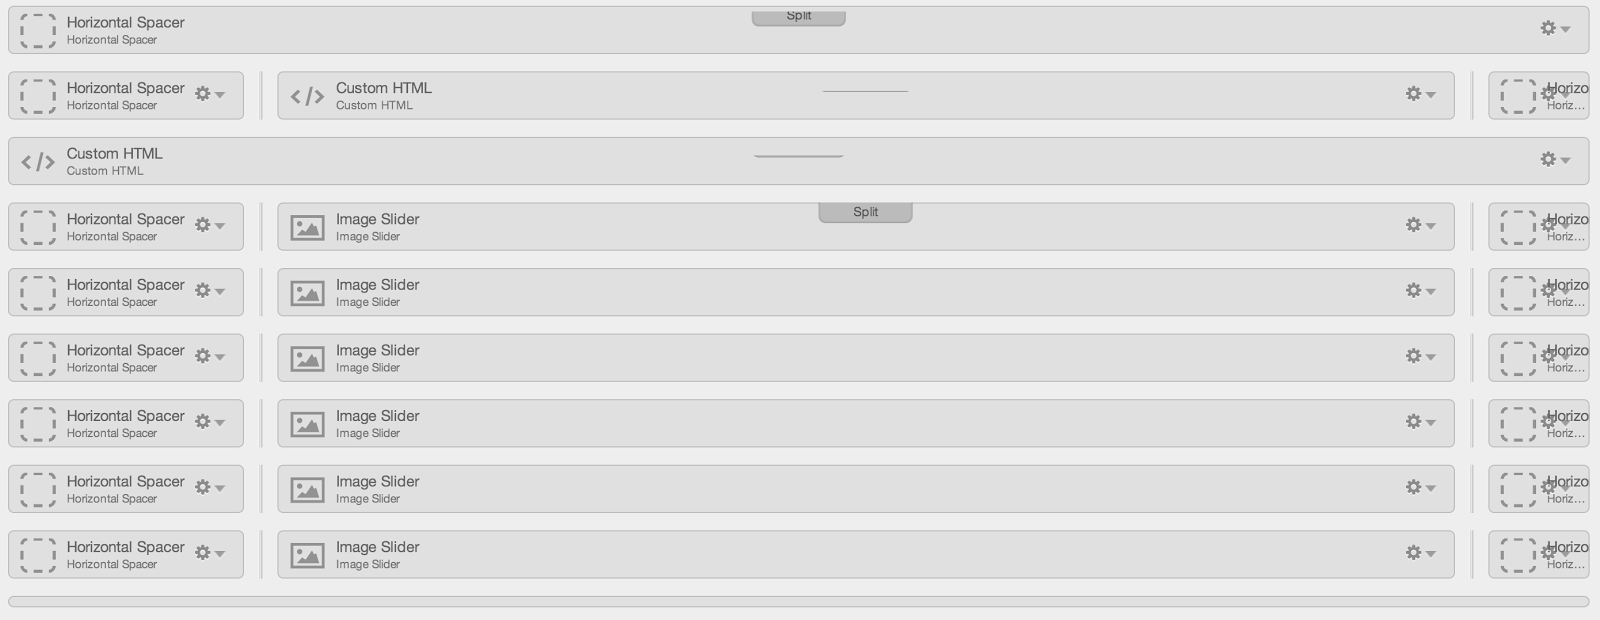
The following screenshot shows the module configuration for the changing property section of the portfolio page.

The HTML Code
The, links, headlines, overview paragraphs, and maps are hand coded into the custom HTML modules using basic: H1 tags, P tags and Iframe tags. Each property section is it’s own <div></div> with it’s own css class. (As a side note when using this technique and pulling in custom maps it is better to use embeddable mapping software like BatchGeo instead of Google Maps.
Below is an example of one property section of code that is pasted into the Custom HTML module within site pages:
Property Hyperlink Link Section of Code
Overview Property Section of Code
<br>
<p id='maps'><iframe src="//www.batchgeo.com/map/37be93066b6bab4b604e4badcd0bf0e1" frameborder="0" width="300" height="350" style="border:1px solid #aaa;border-radius:10px;"></iframe></p>
<p class="overview">
<span style="font-size:1.5em"><strong>Overview</strong></span>
<br>
<br>
The Queen Anne property was a beautiful restoration of mid-century home in the Queen Anne neighborhood of Seattle Washington. The Blackwood team worked to restore key features of the home to keep the character intact.
<br>
<br>
<!--HubSpot Call-to-Action Code -->
<script type="text/javascript">
hbspt.cta.load(336799, 'f7879b80-772e-49c2-893d-48bc26dd6007');
</script>
The Jquery
Background
The jquery is used to hide and show the different property sections of the page. You will use the following section of code to show and reveal different sections of your page.
Code Breakdown
This first section of jquery code essentially hides all but the first property section when the page initially loads.
This next section of Jquery code essentially tells the page what content to load and what content to hide when the “property hyperlinks” are clicked. This first section of code tells the browser to show the .queenanne class while hiding the other classes. The subsequent sections of code tell the browser to show the appropriate content when the right property link is clicked.
$(document).ready(function(){The CSS
As mentioned earlier each property section is a separate div with a unique CSS class. In my page the following six CSS classes were:
-
.queenanne
-
.greenwood
-
.goodwin
-
.ballard
-
.laurelhurst
-
.denny
These css classes identify each div and must be given the following styling in your corresponding HubSpot stylesheet:
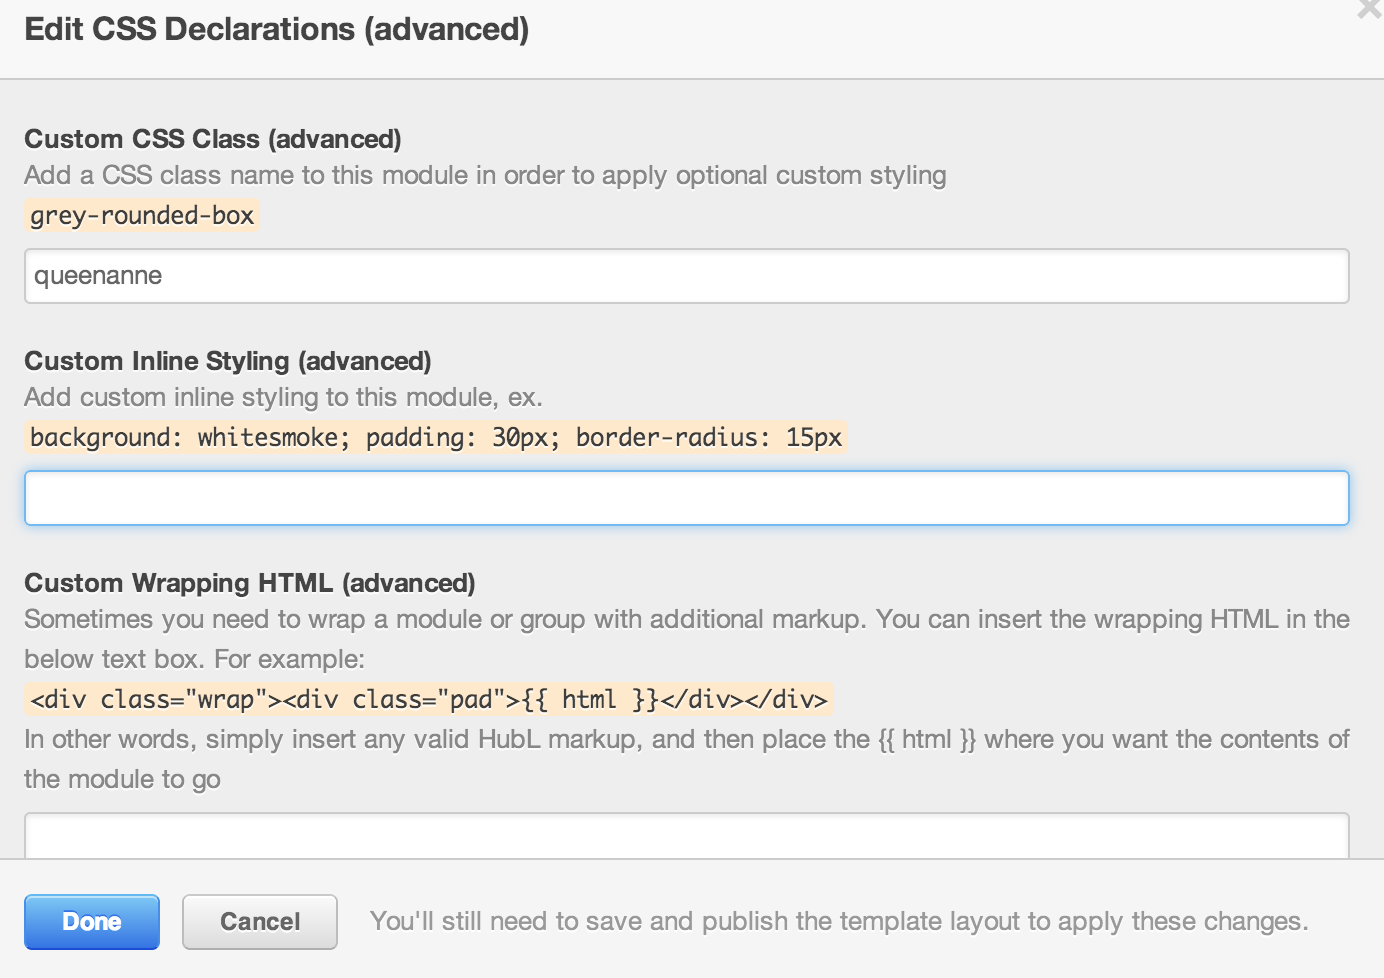
The display none property makes sure that that the content from the other 5 divs aren’t showing before the user clicks on the following links. Finally, you must attach the right CSS class to the hubspot modules within the template builder:

Once you have done all that you're all set. Just refresh the browser and you should be good to go!
Conclusion
In conclusion this is a really cool technique that can be used to showcase a lot of different content on HubSpot site pages or landing pages without forcing the user to scroll. So use it liberally and let me know if you have any questions or hit any snags along the way. Happy HubSpotting!


