 This post originally appeared on HubSpot's Customers Blog.
There's so much you can do with the HubSpot COS that some features get overlooked. Today, I want to highlight four lesser known COS features that can help you with conversions and design, and easy ways to make meaningful changes to your website. These changes help you make improvements to your website when you don't have a lot of time or resources to invest in conversion rate optimization or design.
Ready to jump into each of the four features? Let's dive-in.
1. Page-Specific Navigation
When reading conversion rate optimization best-practices, you'll commonly see that having no navigation within your conversion-pages is at the top of the list. For example on a checkout page or an offer page, you don't necessarily keep your entire website navigation as visitors may jump to another page without completing the desired action.
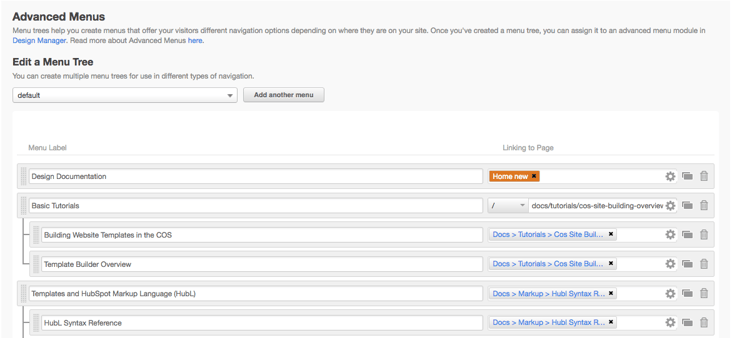
Within the HubSpot COS it's easy to setup page-specific navigation in a few easy steps.
- Go into Content > Content Settings within your HubSpot portal.
- Click on the Advanced Menus option on the left to load your website menu
- Choose the menu tree you want to look at
- Edit the "Linking to Page" sections based on where you want the navigation menu to lead to. If you remove a link the menu will update and not show that option for the specific page you changed.

Note: To use the above, ensure that you are utilizing the advanced menus module within your template. I would recommend reading, How can I edit an Advanced Menu module? before going through this to ensure you have this configured properly.
2. Built-in Icons
Within the default HubTheme in the HubSpot COS we built-in a set of vectors icons that you can use within any icon module, or directly within a rich text field. The built-in icons serve as an easy way to add visual elements to your website and landing pages without requiring more text. You can also add these into any custom-theme you are using by installing Font Awesome within your stylesheets.
To start adding icons simply type [fa icon="home"] in any of the various text modules or the icon module. You can find a full-list of all available icons on the Knowledge Base.
Try it out by copying the text above, or adding an icon module into one of your pages.
3. Module Styling
Want to make small design tweaks to your pages? You don't have to know HTML or CSS to do so within the COS. From changing text styles and size, to adding a background color to your module is easy. This is great if you want to have a specific module, like a special offer or a customer testimonial that you want to get more visibility when visitors are reading through your site.
Let's dive-in.
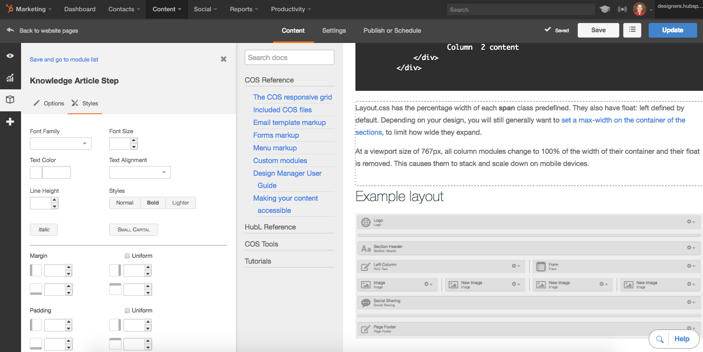
- From within a page, click the Module icon on the left-hand side

- Select the module from the list that you want to edit
- Within the module, click the 'Styles' tab and you can edit information such as Font Family, Size, padding, and much more per the screenshot above.
4. Page-Specific StyleSheets
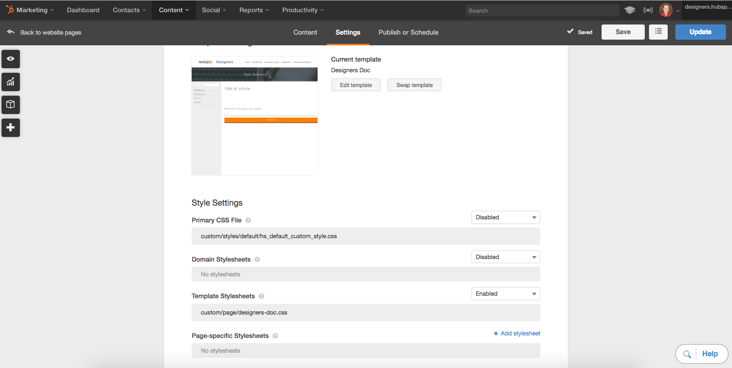
Very much like the above visual changes, what if you want to go beyond just changing the visual elements of a module and change the look of a whole page? Maybe you have a co-marketed event, or a charity event that you want to brand differently and you want one page to look separate than the rest of your website. To do so there is an option on each page to use an individual stylesheet.
From the page, click the Settings tab along the top and scroll towards the bottom of the page. In this section you will notice that you can select a page-specific stylesheet, per the screenshot below.

Have you used any of these functions or have any other functionality that you've used and found helpful? If so, let us know in the comments.


