The Design Manager has always been the core of our content tools at HubSpot. We are excited to announce that we have rebuilt it from the ground-up to better serve website designers and developers. We have focused on improving 4 key areas of the Design Manager: file and folder management, better UX, speed and efficiency, and extensibility. In this post, we'll walk through the most significant improvements to the new Design Manager. We've also included walkthrough videos so you can see the new tool in action!
Key Improvements
The foundation of the new Design Manager is the 3 distinct sections of the UI; the Finder, the Editor and the Inspector.
The Finder
The finder is the where users create and manage their website, blog and email files and folders. Unlike the old Design Manager, the new tool allows full flexibility when creating and managing Files and Folders. You can now manage these files by project, file type, or however you see fit.
Common tasks in the finder:
- Create file
- Create folder
- Nest folders within folders
- Drag and drop files into folders
- Drag and drop folders into folders
- Rename folders
- Rename files
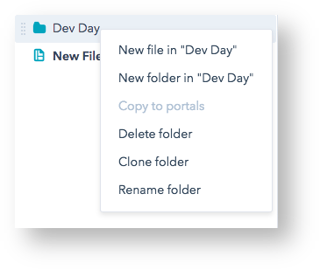
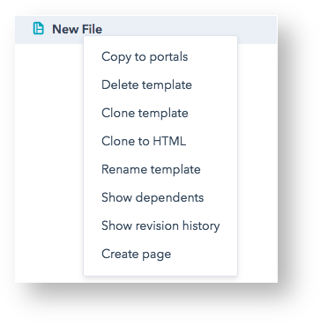
- Users can right click on files and folders for additional actions
- Finder is collapsable by clicking the double chevron icon
Layout Editor
The layout editor is where user will edit drag and drop layouts. The new editor has done away with the gear icon drop downs and modals, and there are a number of improvements that make creating drag and drop templates far more intuitive.
Additions, changes, and things to keep in mind:
- Visible Gridlines (on-hover) : When dragging one module over another, a user can now see all the possible places where that module can be placed.
- Visible CSS Classes: When adding CSS classes to groups and modules a user can now see them directly on the module
- Clone Module Groups: Users can now clone modules and groups within a layout - all in just a few clicks
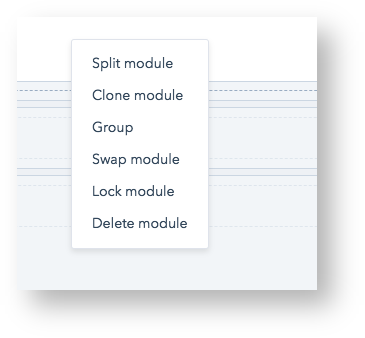
- Right-Click: In the new layout editor, drag-and-drop modules now feature right-click contextual menus, so when you want to swap or split a module, or perform a number of other actions, try right clicking!
Inspector Pane
The Inspector Pane on the right hand side of the Design Manager is where users will edit the properties of a layout, module or group. This is also where users will go to add modules to a drag and drop layout. A number of different actions that occurred in a variety of different places within the old Design Manager, such as attaching style sheets to your template, adding inline styling on a specific module, and adding Head HTML markup, now occur within the Inspector Pane.
Code Editor
The code editor is where users edit and publish HTML, HubL, CSS and JavaScript. For the new Design Manager, we completely redesigned our code editor, specifically with developers and designers in mind.
Additions, changes, and things to keep in mind:
- New dark background to reduce eye-strain: This dark background is preferred amongst developers as the majority of code editors on the market today feature this style.
- Color coded classes: Now classes within your code are highlighted in consistent colors to make it easy for developers to troubleshoot any errors, and find what they are looking for.
- Error checking: In the lower-left hand side of the new code editor is a brand-new error checker. This error checker will look for common HubL errors and makes sure your code will work as expected prior to publishing.
New Module Framework
The new module editor features three editing panes for HTML and HubL, CSS, and JavaScript. Including all three elements allows you to use modules consistently across various portals you manage, or from one template to the next.
Additions, changes, and things to keep in mind:
- CSS and JS are minified and included in the header and footer of the doc respectively.
- Module CSS and JS are only included once in a document, even if a module is used multiple times on a page. This is done to improve your page speed.
- JS is wrapped in a closure for namespacing.
- The CSS and JS sections of the editor will not accept HubL tokens (with the exception of the module_asset_url function which is documented here). If you need to pass field data or other CMS data to the CSS and JS of a module, you have a few options:
- Use appropriate HTML attributes such as data or class to output HubL into your markup.
- Use inline style if necessary.
- Add CSS or JS in the HTML + HUBL section. It is highly recommended that you wrap this code in require_css and require_js tags respectively. Note: since JS in the JS section of the editor is automatically wrapped in a closure, it will be in a separate namespace from JS in the HTML + HUBL section.
Preview APP
The new Design Manager Preview app allows users to live preview their templates on a variety of different devices as they update and change their template. The new preview will update in real-time as changes are made to the layout and code of the page. It's also sharable, so users can quickly share their work and receive feedback from their team.
Speed and Efficiency
Contextual Right Click Menus
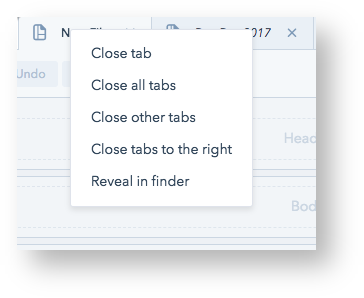
In the new design manager we have added a number of contextual right click menus for common tasks.
Right click on a folder
|
Right click on a file
|
Right click on a tab
|
Right click on a module
|
Key Commands
We have also added a couple key commands to increase efficiencies while working in the Design Manager.
- Delete/Backspace: Deletes a selected module(s).
- Command/Control + Click: Select multiple modules in the drag and drop editor.
- Command/Control + S: Save file.
- Command/Control + P: Focus on search in the finder.
- Command/Control + Z: Undo last action.
- Command/Control + Y: Redo an undo.
Resource and Docs
Design Manager
Module Framework


